Tuesday, December 8, 2009

DSL and Cable Broadband Speed Tweaks

Increase the performance of your broadband connection So-called broadband speed tweaks are techniques to improve performance of DSL and cable Internetbroadband Internet services first became popular connections. Home networking enthusiasts started experimenting with cable and DSL tweaks many years ago, when

Performance tweaks for low-speed (dialup) Internet often do not work for broadband links. Additionally, while broadband speed tweaks originally focused on increasing the performance of general Web surfing, speed tweaks are now more commonly made to tune specific applications like P2P file sharing systems and games.

First, broadband tweaks should be made only after your network is tested and running reliably. Speed tweaks are performance optimizations only, not designed to fix installation errors or basic network configuration issues.

You should expect broadband tweaks might yield only small speed increases, and then only in certain situations. For example, a tweak to improve the performance of one online game may only benefit that title and then only initially when it is loading. Broadband tweaks may help certain applications like games but at the same time slow down others like Web browsing. In general, assume any performance benefits you obtain may be on the order of 10-20% gain rather than 100-200%.

Finally, speed tweaks also can create instability on some networks. Depending on the type of equipment and Internet service you use, some tweaks will be technically incompatible and need

Types of Broadband Speed Tweaks

The most common broadband tweaks involve adjusting various parameters of the TCP/IP network protocol, typically:
  • TCP receive window size
  • Maximum Transmission Unit (MTU)
  • Maximum Segment Size (MSS)
  • Time-To-Live (TTL)
The Microsoft Windows Registry contains default values for TCP/IP parameters. You can apply these speed tweaks to your computers by using a Registry editor or the TCP Optimizer utility (see below) to change some of the default values on each, rebooting the computers each time. Other operating systems like Linux and Mac OS X provide alternative mechanisms to tune TCP/IP parameters.

Another common broadband tweak entails manipulating Web browser settings. For example, suppressing the download of large images saves network bandwidth that can be used instead to download other data faster.

Finally, though less common, a few speed tweaks modify settings on routers and modems. For example, TCP/IP MTU settings can be changed on a broadband router separate from individual computers on the network.

About Web Accelerators for Broadband Tweaks

Speed tweaks have been traditionally applied to the network by an administrator manually, one device at a time, but in recent years software applications have been developed to help automate and maintain tweaks.

So-called Internet download accelerators are pre-packaged software programs that automatically apply speed tweaks to a computer. Installing and running an accelerator program will automatically make the Registry, Web browser and other configuration changes. The more sophisticated applications collect information about your computers and network and apply tweaks intelligently to ensure maximum benefit.

Continue reading...

Monday, December 7, 2009

Turning Off the Recycle Bin

If you want to stop sending deleted files to the Recycle Bin


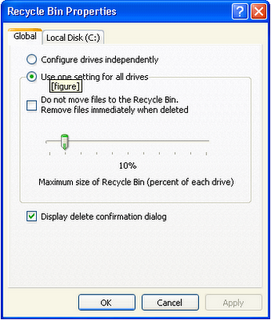
Figure a: The Properties dialog box of the Recycle Bin

1. Right-click the Recycle Bin icon on the desktop, and choose Properties from the shortcut menu. You see the Properties dialog box of the Recycle Bin (Figure a).
2. On the Global tab of the Properties dialog box (or on the tab corresponding to the particular drive whose Recycle Bin you are turning off, if the Configure Drives Independently option is chosen on the Global tab), check the box labeled Do Not Move Files To The Recycle Bin. Remove Files Immediately When Deleted.
3. Click OK.

After you complete this procedure, files you delete from your hard drive are gone, just as are files deleted from floppy drives. Files that were already in the Recycle Bin, however, remain there until you empty the Recycle Bin, delete them, restore them, or move them to another folder.
Continue reading...

University Admission Test Notice, Information, Result

1. Bangladesh University of Engineering and Technology (BUET)

Web:- www.buet.ac.bd

2. Rajshahi University of Engineering and Technology (RUET)

Web:- www.ruet.ac.bd

3. Khulna University of Engineering and Technology (KUET)

Web:- www.kuet.ac.bd

4. Chittagong University of Engineering and Technology (CUET)

Web:- www.cuet.ac.bd

5. Dhaka University of Engineering and Technology (DUET)

Web:- www.duet.ac.bd

6.Bangabandhu Sheikh Mujib Medical University

Web:- www.bsmmu.org

7. Dhaka University

Web:- www.univdhaka.edu

8. Islamic University

Web:- www.iu.ac.bd

9. Jahangirnagar University

Web:- www.juniv.edu

10. Rajshahi University

Web:- www.ru.ac.bd

11. Khulna University

Web:- www.ku.ac.bd

12. University of Chittagong

Web:- www.cu.ac.bd

13. Jagannath University

Web:- www.jnuni.net

14. Shahjalal University of Science and Technology

Web:- www.sust.edu

15. Bangabandhu Sheikh Mujibur Rahman Agricultural University

Web:- www.bsmrau.com

16. Hajee Mohammad Danesh Science and Technology University

Web:- www.hstu.ac.bd

17. Bangladesh Agricultural University

Web:- www.bau.edu.bd

18. Bangladesh Open University (BOU)

Web:- www.bou.edu.bd

19. Bangladesh University of Professionals

20. Begum Rokeya University, Rangpur

Web:- www.rangpuruniv.edu.bd

21. Chittagong Veterinary & Animal Science University

Web:- N/A

22. Comilla University

Web:- N/A

23. College of Textile Technology, Dhaka

24.
Islamic University of Technology (IUT)

Web:- www.iutoic-dhaka.edu

25. Jatiya Kabi Kazi Nazrul Islam University

Web:- www.jkkniu.edu.bd

26. Jessore Science & Technology University

Web:- www.jstu.edu.bd

27. (A) Mawlana Bhasani Science and Technology University

Web:- www.mbstu.ac.bd

28. (B) Medical College

Web:- http://dghs.gov.bd

29. (C) Armed Forces Medical College

30. (D)Government Dental College of Bangladesh

31. National University

Web:- www.nu.edu.bd

32. Noakhali Science and Technology University

Web:- www.nstu.edu.bd

33. Pabna University of Science & Technology

Web:- www.pust.ac.bd

34. Patuakhali Science and Technology University

Web:- www.pstu.ac.bd

35. Sher-E-Bangla Agricultural University

Web:- www.sau.ac.bd

36. Sylhet Agricultural University

Web:- N/A

Continue reading...

Resizing the Recycle Bin As Your Wish.

By default, the maximum size of the Recycle Bin on any hard drive is 10 percent of the size of the drive itself. For example, a 10GB hard drive has a maximum Recycle Bin size of 1GB--a lot of space to use up for files you've decided to delete. If you delete an object that would cause the Recycle Bin to exceed that size, Windows warns you with an error message.


Figure 1: The Properties dialog box of the Recycle Bin

Having a maximum size for the Recycle Bin forces you not to clutter your hard drive with useless, deleted files, and 10 percent is as good a maximum size as any. But you may decide either to raise this limit (because you don't want to lose any of the files currently in the Recycle Bin) or lower it (because disk space is getting tight), either of which you can do by following this procedure:

  1. Right-click the Recycle Bin icon on the desktop, and choose Properties from the shortcut menu. You see the Properties dialog box of the Recycle Bin (Figure 1).
  2. The Properties dialog box contains a Global tab, plus a tab for each hard drive on your system. If you want to change the maximum size setting for all the hard drives at once, set the new maximum size of the Recycle Bin (as a percentage of total drive space) by moving the slider on the Global tab. Then click OK. Skip the remaining steps.
  3. If you want to reset the maximum Recycle Bin size for only a single drive, leaving the others the same, select the Configure Drives Independently radio button on the Global tab.
  4. Click the tab for the drive you want to change.
  5. Set the slider on that tab.
  6. Click OK
Continue reading...

Customizing a Folder behavior

Windows gives you considerable power over the appearance of a folder in an Explorer window. You can select a new folder template for the folder, choose a picture to display on the folder's icon in Thumbnails view, or select a new icon entirely to represent the folder in any view.

These changes are made from the Customize tab of the folder's Properties dialog box, shown in Figure 1. To display this tab, do either of the following:

  • Right-click the folder's icon and choose Properties from the shortcut menu, then click the Customize tab in the Properties dialog box.
  • Open the folder and then choose View | Customize This Folder.


Figure 1: Customize a folder from the Customize tab of the folder's Properties dialog box.
Continue reading...

History Of Oracle Database

The following are the important events and years in which these events took place.

Network and Hierarchical Models

Charles Bachman of General Electric proposed a network model with data records linked together, forming intersecting sets of data in 1964.

The North American Aviation's Space Division and IBM developed a second approach based on a hierarchical model in 1965. In this model, data is represented as tree structures in a hierarchy of records.

IBM's product based on this model was brought to market in 1969 as the Information Management System (IMS).

Birth Of Relational Model - early 1970

The concept of the relational database was first described around 1970 by Dr. Edgar F. Codd in an IBM research publication entitled "System R4 Relational."

Relational Software, Incorporated (RSI) was founded in 1979 and released Oracle V.2 as the world's first relational database.

By 1985, Oracle could claim more than 1,000 relational database customer sites. IBM itself would not embrace relational technology in a commercial product until the Query Management Facility in 1983.

Birth of Oracle Corporation - 1983

RSI (Relational Software, Incorporation) was renamed to Oracle Corporation.

Beginning of Portability

Oracle Corporation created a portable version of Oracle (Version 3) that ran not only on Digital VAX/VMS systems, but also on Unix and other platforms.

By 1985 , Oracle claimed the ability to run on more than 30 platforms.

Client/Server database - 1986

Since networks became available in mid 80s, Oracle started supporting Client/Server model.

Oracle Financials - 1988

Oracle entered into products market and developed its EPR product- Oracle Financials based on Oracle Relational Database.

Oracle6 - 1989

Oracle version 6.0 was released in 1989. First time PL/SQL entered into scene. Integrity constraints are only declared but not defined.

Oracle7 - 1993

Oracle release version 7.0 in 1993. It provided complete support for Integrity constraints.

Oracle8 - 1997

Oracle for the first started supporting objects in Database. As Oracle started supporting object, it is also called as ORBDMS ( Object Relational Database Management System) from Oracle8 onwards.

Also introduced features related to VLDB(Very Large Database) features such as partitioning tables.

Oracle8i - 1999

Oracle corporation started saying moving towards Internet model, where everything is stored in Internet.

One of the biggest new features is support for Java in Oracle database. You can use either PL/SQL or Java. Oracle database contains Java Virtual Machine.

To read more about what is new in Oracle8i, read What's new in Oracle8i article.

Oracle9iAS - 2000

Oracle corporation is no longer a company providing only database management system and instead started providing all that it takes to develop and deploy a complete application.

AS(Application Server) runs on middle tier in 3-tier Client/Server architecture boosting the performance.

Oracle9iDB - 2001

Oracle9i Database was released. It is said that it has 400 new features all together.

You can get information about new features that were introduced in Oracle9iDB through New features of Oracle9i Database

Now, Oracle Corporation is second largest software first only next to Microsoft. It's head Larry Ellison believes that application are to be run on Internet and not on Client/Server. He says this is Information Age. He also says the order of the day is Suite ( a collection of products that are designed to be used together). That is the reason Oracle9i comes with three modules - Database, Developer Suite and Application Server, which are used together to developer an Internet application.

If you have any other interesting statistics about Oracle Corporation’s present or past, please send a mail to kamrul.aece@yahoo.com.

Continue reading...

SQL and RDBMS

SQL:
SQL is an acronym for Structured Query Language and is a standard relational query language (SQL has been standardized by both ANSI and ISO) used for interaction with databases.

SQL was developed by IBM in 1970s and has its roots in the relational algebra defined by Codd in 1972. SQL functionality goes beyond the relational algebra, allowing to retrieve data, insert data, modify existing data and delete data from/to a RDBMS. SQL features arithmetic operators like division, multiplication, subtraction and addition, and comparison operators (=, >=, <=). SQL also defines several aggregate functions like MAX, MIN, AVG, COUNT, and SUM. SQL defines many keywords, which can be divided into several categories. The first SQL keyword category is for keywords used for data retrieval like the SELECT keyword. The second category is for the SQL keywords used for data manipulation like the INSERT, UPDATE, and DELETE SQL keywords. The third category is the transactional SQL keywords category, featuring keywords like COMMIT and ROLLBACK. Another SQL keyword category is the SQL Data Definition Language category featuring words like CREATE and DROP. Yet another category of SQL keywords controls the authorization and permission aspects of RDBMS (GRANT and REVOKE keywords). SQL is pronounced as “S-Q-L” or “see-quill”. SQL uses -- character sequence as a single line comment identifier. SQL commands are not case sensitive and the following SQL queries are equivalent:
SELECT * FROM Users

select * from Users

There are many SQL implementations also called SQL dialects and SQL extensions. For example MS SQL Server specific version of the SQL is called Transact-SQL, Oracle version of SQL is called PL/SQL, MS Access version of SQL is called JET SQL.

This SQL Tutorial will show you how to use SQL and its commands. You will be able to apply most of the knowledge gathered from this SQL tutorial to any Relational Database Management System.

RDBMS:

RDBMS is an acronym for Relational Database Management System. The data in RDBMS is stored in database objects called tables. The database tables are the primary data storage for every RDBMS and essentially they are collections of related data entries. For example a table called Users might store information about many persons, and each entry in this table will represent one unique user. Even though all user entries in the Users table are unique, they are related in the sense that they describe similar objects.

Table Users

FirstNameLastNameDateOfBirth
JohnSmith12/12/1969
DavidStonewall01/03/1954
SusanGrant03/03/1970

Each database table consists of columns and rows. Each table column defines the type of data stored in it, and this data type is valid for all rows in this table. A table row is a collection of data having 1 entry for each column in this particular table.

RDBMS store the data into group of tables, which might or might not be related by common fields (database table columns). RDBMS also provide relational operators to insert/update/delete information stored into the database tables.

MS SQL Server, DB2, Oracle and MySQL are all Relational Database Management Systems.

I’ll be using the RDBMS and database words interchangeably throughout this SQL Tutorial, so whenever I use the word database I mean RDBMS and the other way around.
Continue reading...

Database

A database is a collection of data. That may sound overly simplistic but it pretty much sums up what any database is.

A database could be as simple as a text file with a list of names. Or it could be as complex as a large, relational database management system, complete with in-built tools to help you maintain the data.

Before we get into dedicated database management systems, let's start with the basics - let's look at a simple text file example.

Text File

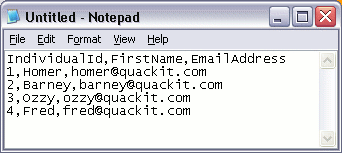
Imagine we have a text file called "Individual.txt", and that the contents look like this:

Notepad text file

We could use this information to do things such as send an email to everyone on our list. We could do this because, due to the way we designed the list, we know that each row contains a different individual, and the information on that row is related to that individual. Also, the items in each row are separated by commas. Therefore, we know that the email address next to "Homer" is his email address. We could also call each row a record. Therefore, we currently have 4 records in our database.

With a small list like this, a text file may serve our purposes perfectly.

Spreadsheet

Another option would be to store it in a spreadsheet using spreadsheet software (for example, Microsoft Excel). That way, we could do some extra things with our list (such as format it, or sort by first name/surname etc).

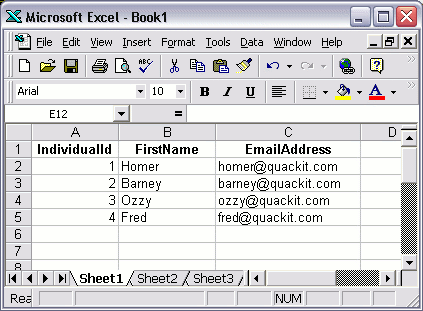
A spreadsheet program like Excel makes these tasks relatively easy to do. Also, programs like Excel organize the data into rows and columns, making your data easier to comprehend. Something like this:

Excel spreadsheet

Database Software

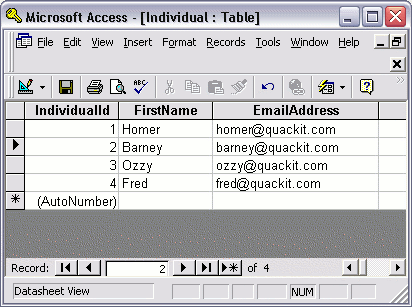
A better option would be to store the data in a database table using specialized database software, such as Microsoft Access. Something like this:

Microsoft Access database table

So What's the Difference?

You may be wondering what the difference is between the last two examples (Excel vs Access). After all, both examples have the data organized into rows and columns.

There are many differences between spreadsheet software and database software. The rest of this tutorial will show you why database software is a much better option for creating databases.

Continue reading...

Database Management Systems

A Database Management System (DBMS), is a software program that enables the creation and management of databases. Generally, these databases will be more complex than the text file/spreadsheet example in the previous lesson. In fact, most of today's database systems are referred to as a Relational Database Management System (RDBMS), because of their ability to store related data across multiple tables.

Some of the more popular relational database management systems include:

  • Microsoft Access
  • Filemaker
  • Microsoft SQL Server
  • MySQL
  • Oracle

Throughout this tutorial, you will become familiar with some of the key concepts of database management systems. These include:

  • Database creation
  • Tables
  • Adding data to your database
  • Querying a database
  • Relational database design

What Does a Database Management System Look Like?

Different database management systems look different, but generally, there are a number of common features that you'll usually see across most of them.

Microsoft Access

Microsoft Access Database Management System

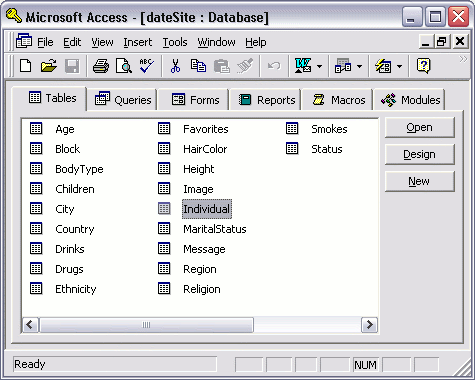
This is the main screen you'll see when opening up Access to view an existing database. The outer part is the database management system and it's menu, the middle part is the actual database. In this example, the database is called "dateSite" and has 20 tables. If you were to open a different database, the name of the database would be different and you would see different tables, but the available options would be the same (i.e. Tables, Queries, Forms, Reports, Macros, Modules, Open, Design, New).

Some of these options are common across all database management systems. All database systems allow you to create tables, build queries, design a new database, and open an existing database.

Microsoft SQL Server

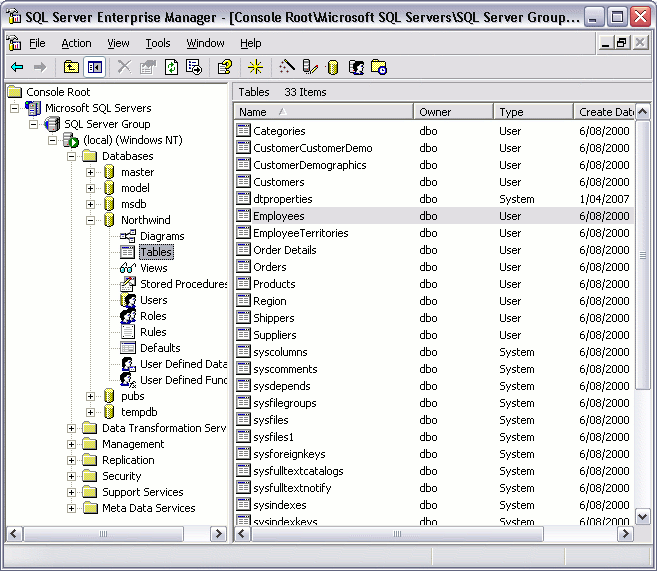
Microsoft SQL Server - Enterprise Manager

Microsoft SQL Server is a more robust database management system than Access. While Access is better suited to home and small office use, SQL Server is more suited to enterprise applications such as corporate CRMs and websites etc.

The above screen is what you see when you open SQL Server through Enterprise Manager. Enterprise Manager is a built-in tool for managing SQL Server and its databases. In this example, there are 6 databases. Each database is represented down the left pane, and also in the main pane (with a "database" icon).

Which Database System to Use?

If you are using a database for home or small office use, Microsoft Access or Filemaker should be fine. If you need to create a database driven website, then you're better off using a more robust system such as SQL Server, Oracle, or MySQL.

The examples in this tutorial use Microsoft Access. If you don't have Microsoft Access, you should still be able to follow the examples. The tasks we perform are the same tasks you would need to perform regardless of which database management system you use. The key goal with this tutorial is to provide you with an overview of what is involved in creating and maintaining a database.

Continue reading...

Sunday, December 6, 2009

Configure the Standard Buttons Toolbar

The six Standard Buttons are not the only ones you could have on your toolbar. In fact, you can choose from a total of 21 buttons, and you can display any collection of them in any order you want. This rearranging takes place in the Customize Toolbar dialog box, shown in Figure 1. To open this dialog box, select View | Toolbars | Customize, or right-click the toolbar itself and choose Customize from the shortcut menu.


Figure 1: Clicking Add puts a Stop button between Forward and Up.

The Customize Toolbar dialog box is well designed. The buttons you are currently displaying are listed in the Current Toolbar Buttons (right-hand) window, and the ones you are not displaying are in the Available Toolbar Buttons (left-hand) window. To add a button, select it in the left-hand window and click the Add button. To remove a button, select it in the right-hand window and click the Remove button.

You can change the order of the buttons you display as follows: select a button in the right-hand window, and then click the Move Up or Move Down buttons. The top-to-bottom order of the buttons in the Current Toolbar Buttons window is the left-to-right order of the buttons on the Standard Buttons toolbar. Group buttons together by inserting a separator. You can have as many separators on your toolbar as you like; the separator is the only item in the left-hand window that doesn't vanish when you move it to the right-hand window.

The amount of space the buttons take up on the toolbar is determined by the size of the button's icon and the text label. You can change either of these with the two drop-down lists at the bottom of the Customize Toolbar dialog box. The combination No Text Labels and Small Icons enables you to put a lot of small buttons on the toolbar, while Show Text Labels/Large Icons gives you a few big buttons.

Continue reading...

Changing the Behavior of Explorer Windows

The Explorer windows of Windows XP are descended from two parents: the folder windows of Windows 95 and the browser windows of Internet Explorer. The default settings of the Explorer windows borrow a little from each parent. If you don't like this compromise, you can change your settings from the Folder Options dialog box, shown in Figure k. To open this dialog box, choose Tools | Folder Options from the menu of Windows Explorer, or open the Control Panel and choose Folder Options from the Appearances and Themes category.

If, after experimenting with new settings, you decide the designers of Windows XP had it right after all, you can return to the Folder Options dialog box and click the Restore Defaults button.


Figure k: The General tab of the Folder Options dialog box, with the default settings.
Continue reading...

How to Help Displaying Screens

To see the Help And Support Center window (shown in Figure a), choose Start | Help And Support. The toolbar shows many of the same icons you see in any Explorer window, including Back, Forward, Home, Favorites, and History. You also see Index, Support, and Options commands. The Task pane (left side of the window) shows a list of topics from which to choose. The rest of the window displays the help information you request from the Task pane.


Figure a.: The Home page of the Help And Support Center

When the Help And Support Center window first appears, you see lists of help topics and tasks (click Home on the toolbar to return to it). Click a topic to see a detailed list of subtopics in the left pane. When you see a plus box to the left of a topic, click the plus box to see its subtopics. When you see a topic with a question-mark icon to its left, clicking the topic displays an explanation, and steps to follow, in the right pane. If a word or phrase becomes underlined when you move your mouse pointer over it, click it to see information about that topic.

If your computer is connected to the Internet, Windows automatically updates the home page of the Help And Support Center with news and updates, which appear in the lower-right corner of the window

Continue reading...

Thursday, December 3, 2009

How to Installing Programs Using the Add Or Remove Programs Window

Follow these steps to use the Add Or Remove Programs window to help you install a program:

  1. Choose Start | Control Panel. You see the Control Panel window.
  2. Click the Add Or Remove Programs category. Or, in Classic view of the Control Panel, run the Add Or Remove Programs program--if the icon is underlined, click it once; if not, double-click it. You can control whether you need to single-click or double-click icons to run programs.
  3. You see the Add Or Remove Programs window. This window has three buttons down the left side. Click the Add New Programs button so the window looks like Figure 1.


Figure 1: Add or Removes Programs window, when the Add New Programs button is selected.
  1. If you are installing a program from a floppy disk or CD-ROM, insert the disk or CD-ROM into its drive and click the CD Or Floppy button. If you are installing a program from a file on your hard disk or on a network drive, click the CD Or Floppy button anyway--you'll have a chance to tell it where to look for the program in a minute. Windows looks on any floppy disk or CD-ROM in your drives for an installation program (that is, a program named Setup.exe or Install.exe). If Windows finds an installation program, skip to step 7.
  2. If Windows doesn't find an installation program, you see the Run Installation Program dialog box, which asks for the full pathname of the installation program.
  3. Click the Browse button and specify the installation program you want to run in the Browse window. You can browse to any disk on your computer, or any disk accessible over your LAN, if you are connected to one. Click Open when you find the installation program.
  4. When the pathname of the installation program appears in the Run Installation Program box, click the Finish button. The installation program runs. Follow the instructions on the screen to install the program.

Once you install a program, the program name usually (but not always) appears in the list that the Add Or Remove Programs window displays when you click the Change Or Remove Programs button.

Continue reading...

Shutting Down and Restarting Windows

When you need to turn off the computer, you must shut down Windows first to allow Windows to close all its files and do other housekeeping tasks before terminating. To shut down Windows, choose Start | Turn Off Computer, click anywhere on the desktop and press ALT-F4, or press CTRL-ESC and choose Shut Down. You see the Turn Off Computer dialog box:


Your options are

  • Stand By Stores the programs and data that are currently open, and then shuts down Windows so you can turn the computer off. The next time you turn your computer on, you can pick up just where you left off.
  • Turn Off Shuts down Windows. Windows displays a message when you can safely turn off the computer. Don't turn off the computer until you see this message. Computers with advanced power management shut off automatically.
  • Restart Shuts down Windows, and then reloads it (useful if your computer starts acting funny).

If programs are running, Windows closes them before shutting down, switching to standby, or restarting. If a program has unsaved files open, the program should ask you whether you want to save your work before the program exits.

Continue reading...

Various Type of New Networking Features

Windows XP also adds many new network features especially designed to make corporate networking easier and more reliable, including
  • Networking has been integrated into the Task Manager to display real-time network usage and connection-speed information.
  • An enhanced Netdiag.exe command-line diagnostics tool is provided on the Windows XP CD-ROM.
  • An enhanced version of Network Driver Interface Specification (NDIS), version 5.1, with support for PnP and Power Event Notification, send cancellation, better statistics capability, and better performance.
  • A new version of the Windows Telephony API (TAPI), version 3.1, with support for H.323-compatible IP telephony and IP multicast A/V conferencing, recording of streaming A/V data for playback, USB phones, automatic discovery of telephony servers, and support for H.323 services such as call hold, call transfer, call diversion, call pack, and call pickup.
  • Support for newer network devices, including HomePNA phoneline networks, USB-connected network devices, software-based (also called controllerless or "Winmodem") modems, and infrared-enabled cell phones (as modems).
  • Support for Universal Plug and Play (UPnP) devices on a network, and use of UPnP to detect Internet Connection Sharing (ICS) hosts on a network.
  • Network bridgingOne computer can run two different types of networks (such as Fast Ethernet and IEEE 802.11b [Wi-Fi] wireless Ethernet) and act as a connection between them. You need a network card for each network type you're bridging.
  • Auto-configuration of IEEE 802.11b Wi-Fi networksWi-Fi (wireless Ethernet) networks are harder to configure than wired networks such as Fast Ethernet, because you must synchronize the card to the wireless access point that allows your PC to talk to others. Windows XP Professional detects the correct settings automatically.
  • Ability to store and recall settings of various wireless networks the user has connected to in the past for automatic configuration when the same network is encountered again. This feature simplifies moving between multiple wireless networks, such as home and office or different offices. Post SP2, the UI for wireless is more graphical and intuitive, and XP remembers which networks you have previously authorized an insecure connection for, and automatically connects when that network is available in the future. Available networks are arranged in order of signal strength, as show in Figure 1.1

Figure 1.1. Friendlier wireless networking interface reports available networks and remembers last session's settings.

[View full size image]


  • An enhanced Connection Manager with new management options, split tunneling (secure VPN and public Internet access at the same time), Favorites feature for storing connection settings for different locations (useful for business travelers), client-side logging for troubleshooting, and support for ICS.
  • The enhanced Network Troubleshooter feature, available from the left-hand menu of the Network Connections menu, provides one-stop access to network-related tools in the Help and Support center. You can start Ping and Net View commands to diagnose and check Internet and LAN connections, as well as run troubleshooters for Internet Connection Sharing, Modems, and other home and corporate network configurations. A new Network Diagnostics tool scans the network and tests your network card. As shown in Figure 1.2 at the end of the testing process, it displays the results of its tests for Internet service settings, computer information, and network adapters (including modems).

Figure 1.2 The Network Diagnostics tool displays the configuration of both hardware and software components on your network.

[View full size image]


  • Support for encrypted folders with multiple users.
  • Remote desktop support via Remote Desktop Protocol (RDP), enabling users to access their computers remotely from anywhere with network access, including other offices, at home, or airport kiosks.
  • Improved Group Policy feature with hundreds of new policies provided, making it easier to choose a predefined policy instead of needing to modify one.
  • Remote Assistance to allow network or Internet-based help desk personnel to view a user's display and provide training or technical assistance. This feature can be centrally enabled or disabled as desired.
Continue reading...

Difference Between Windows XP Versus Linux

Trying to compare Windows XP versus Linux is difficult for several reasons, including
• Windows XP requires a relatively recent computer with at least 128MB of RAM to function, while Linux can run successfully on even 486-based systems long obsolete for use with Windows
• Windows XP is available in just two versions (Home Edition and Professional), while Linux is available in numerous distributions
• Windows XP is primarily a GUI-based operating system, while Linux is primarily command-line driven (although KDE and Gnome, the two most common GUIs, are increasingly popular)
Although Linux has made great strides in so-called "back end" uses such as Web servers, network servers, and embedded devices, Windows XP is a better choice for desktops for several reasons, including
• Journaling file system for higher reliability and crash recovery.
• Compatibility testing and guarantees for operating system and applications.
• Wide availability of commercial applications at retail and online stores.
• Clustering and base-load balancing.
• Long-term roadmap of operating system deployment plans.
• Larger hard disks and maximum file sizes. Linux's maximum file size is 2 Gigabytes; Windows XP's limit is 18.4 quintillion bytes (Petabytes).
• "Synchronous I/O," which allows smoother running in Windows XP when multiple threads are being processed and waiting for input or output. It improves SMP scalability as well.
• Consistent GUI across all toolsLinux has no single standard GUI at present.
• A single version which can be installed for most major languages and countries.
• Dedicated support network, with close to one-half million Microsoft-certified trained professionals and engineers.
We believe that the entire Linux/Windows controversy comes down to this: Microsoft offers lots and lots of powerful stuff (which you can use to build very sophisticated software) from the C++ compiler, to the component-nature of Excel and other apps, to the ASP scripting language, COM, and so on. These tools let you leverage everything Microsoft offers to make very powerful applications. As people used to say in the '60s and '70s, nobody ever lost his job buying IBM. Now it's safe to say nobody ever lost his job buying Microsoft. True, you're locked into Windows because the stuff you build on Windows systems can't be ported to UNIX variants, but that's the price you pay for the tools, the user base, and the support and training. Although increasing support options are available for Linux (see www.linuxcare.com), enterprise-level support for Linux is still not as widespread as for Windows.
Continue reading...
 

Friends

Followers

Fave This

Computer Technology Tips and Tricks for Devlopment Copyright © 2009 Magazine 3 Column is Designed by kamrul