Showing posts with label Make Fast PC. Show all posts

Monday, December 7, 2009

Turning Off the Recycle Bin

If you want to stop sending deleted files to the Recycle Bin


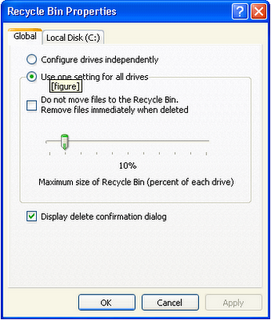
Figure a: The Properties dialog box of the Recycle Bin

1. Right-click the Recycle Bin icon on the desktop, and choose Properties from the shortcut menu. You see the Properties dialog box of the Recycle Bin (Figure a).
2. On the Global tab of the Properties dialog box (or on the tab corresponding to the particular drive whose Recycle Bin you are turning off, if the Configure Drives Independently option is chosen on the Global tab), check the box labeled Do Not Move Files To The Recycle Bin. Remove Files Immediately When Deleted.
3. Click OK.

After you complete this procedure, files you delete from your hard drive are gone, just as are files deleted from floppy drives. Files that were already in the Recycle Bin, however, remain there until you empty the Recycle Bin, delete them, restore them, or move them to another folder.
Continue reading...

Resizing the Recycle Bin As Your Wish.

By default, the maximum size of the Recycle Bin on any hard drive is 10 percent of the size of the drive itself. For example, a 10GB hard drive has a maximum Recycle Bin size of 1GB--a lot of space to use up for files you've decided to delete. If you delete an object that would cause the Recycle Bin to exceed that size, Windows warns you with an error message.


Figure 1: The Properties dialog box of the Recycle Bin

Having a maximum size for the Recycle Bin forces you not to clutter your hard drive with useless, deleted files, and 10 percent is as good a maximum size as any. But you may decide either to raise this limit (because you don't want to lose any of the files currently in the Recycle Bin) or lower it (because disk space is getting tight), either of which you can do by following this procedure:

  1. Right-click the Recycle Bin icon on the desktop, and choose Properties from the shortcut menu. You see the Properties dialog box of the Recycle Bin (Figure 1).
  2. The Properties dialog box contains a Global tab, plus a tab for each hard drive on your system. If you want to change the maximum size setting for all the hard drives at once, set the new maximum size of the Recycle Bin (as a percentage of total drive space) by moving the slider on the Global tab. Then click OK. Skip the remaining steps.
  3. If you want to reset the maximum Recycle Bin size for only a single drive, leaving the others the same, select the Configure Drives Independently radio button on the Global tab.
  4. Click the tab for the drive you want to change.
  5. Set the slider on that tab.
  6. Click OK
Continue reading...

Customizing a Folder behavior

Windows gives you considerable power over the appearance of a folder in an Explorer window. You can select a new folder template for the folder, choose a picture to display on the folder's icon in Thumbnails view, or select a new icon entirely to represent the folder in any view.

These changes are made from the Customize tab of the folder's Properties dialog box, shown in Figure 1. To display this tab, do either of the following:

  • Right-click the folder's icon and choose Properties from the shortcut menu, then click the Customize tab in the Properties dialog box.
  • Open the folder and then choose View | Customize This Folder.


Figure 1: Customize a folder from the Customize tab of the folder's Properties dialog box.
Continue reading...

Sunday, December 6, 2009

Configure the Standard Buttons Toolbar

The six Standard Buttons are not the only ones you could have on your toolbar. In fact, you can choose from a total of 21 buttons, and you can display any collection of them in any order you want. This rearranging takes place in the Customize Toolbar dialog box, shown in Figure 1. To open this dialog box, select View | Toolbars | Customize, or right-click the toolbar itself and choose Customize from the shortcut menu.


Figure 1: Clicking Add puts a Stop button between Forward and Up.

The Customize Toolbar dialog box is well designed. The buttons you are currently displaying are listed in the Current Toolbar Buttons (right-hand) window, and the ones you are not displaying are in the Available Toolbar Buttons (left-hand) window. To add a button, select it in the left-hand window and click the Add button. To remove a button, select it in the right-hand window and click the Remove button.

You can change the order of the buttons you display as follows: select a button in the right-hand window, and then click the Move Up or Move Down buttons. The top-to-bottom order of the buttons in the Current Toolbar Buttons window is the left-to-right order of the buttons on the Standard Buttons toolbar. Group buttons together by inserting a separator. You can have as many separators on your toolbar as you like; the separator is the only item in the left-hand window that doesn't vanish when you move it to the right-hand window.

The amount of space the buttons take up on the toolbar is determined by the size of the button's icon and the text label. You can change either of these with the two drop-down lists at the bottom of the Customize Toolbar dialog box. The combination No Text Labels and Small Icons enables you to put a lot of small buttons on the toolbar, while Show Text Labels/Large Icons gives you a few big buttons.

Continue reading...

Changing the Behavior of Explorer Windows

The Explorer windows of Windows XP are descended from two parents: the folder windows of Windows 95 and the browser windows of Internet Explorer. The default settings of the Explorer windows borrow a little from each parent. If you don't like this compromise, you can change your settings from the Folder Options dialog box, shown in Figure k. To open this dialog box, choose Tools | Folder Options from the menu of Windows Explorer, or open the Control Panel and choose Folder Options from the Appearances and Themes category.

If, after experimenting with new settings, you decide the designers of Windows XP had it right after all, you can return to the Folder Options dialog box and click the Restore Defaults button.


Figure k: The General tab of the Folder Options dialog box, with the default settings.
Continue reading...

How to Help Displaying Screens

To see the Help And Support Center window (shown in Figure a), choose Start | Help And Support. The toolbar shows many of the same icons you see in any Explorer window, including Back, Forward, Home, Favorites, and History. You also see Index, Support, and Options commands. The Task pane (left side of the window) shows a list of topics from which to choose. The rest of the window displays the help information you request from the Task pane.


Figure a.: The Home page of the Help And Support Center

When the Help And Support Center window first appears, you see lists of help topics and tasks (click Home on the toolbar to return to it). Click a topic to see a detailed list of subtopics in the left pane. When you see a plus box to the left of a topic, click the plus box to see its subtopics. When you see a topic with a question-mark icon to its left, clicking the topic displays an explanation, and steps to follow, in the right pane. If a word or phrase becomes underlined when you move your mouse pointer over it, click it to see information about that topic.

If your computer is connected to the Internet, Windows automatically updates the home page of the Help And Support Center with news and updates, which appear in the lower-right corner of the window

Continue reading...

Thursday, December 3, 2009

How to Installing Programs Using the Add Or Remove Programs Window

Follow these steps to use the Add Or Remove Programs window to help you install a program:

  1. Choose Start | Control Panel. You see the Control Panel window.
  2. Click the Add Or Remove Programs category. Or, in Classic view of the Control Panel, run the Add Or Remove Programs program--if the icon is underlined, click it once; if not, double-click it. You can control whether you need to single-click or double-click icons to run programs.
  3. You see the Add Or Remove Programs window. This window has three buttons down the left side. Click the Add New Programs button so the window looks like Figure 1.


Figure 1: Add or Removes Programs window, when the Add New Programs button is selected.
  1. If you are installing a program from a floppy disk or CD-ROM, insert the disk or CD-ROM into its drive and click the CD Or Floppy button. If you are installing a program from a file on your hard disk or on a network drive, click the CD Or Floppy button anyway--you'll have a chance to tell it where to look for the program in a minute. Windows looks on any floppy disk or CD-ROM in your drives for an installation program (that is, a program named Setup.exe or Install.exe). If Windows finds an installation program, skip to step 7.
  2. If Windows doesn't find an installation program, you see the Run Installation Program dialog box, which asks for the full pathname of the installation program.
  3. Click the Browse button and specify the installation program you want to run in the Browse window. You can browse to any disk on your computer, or any disk accessible over your LAN, if you are connected to one. Click Open when you find the installation program.
  4. When the pathname of the installation program appears in the Run Installation Program box, click the Finish button. The installation program runs. Follow the instructions on the screen to install the program.

Once you install a program, the program name usually (but not always) appears in the list that the Add Or Remove Programs window displays when you click the Change Or Remove Programs button.

Continue reading...

Shutting Down and Restarting Windows

When you need to turn off the computer, you must shut down Windows first to allow Windows to close all its files and do other housekeeping tasks before terminating. To shut down Windows, choose Start | Turn Off Computer, click anywhere on the desktop and press ALT-F4, or press CTRL-ESC and choose Shut Down. You see the Turn Off Computer dialog box:


Your options are

  • Stand By Stores the programs and data that are currently open, and then shuts down Windows so you can turn the computer off. The next time you turn your computer on, you can pick up just where you left off.
  • Turn Off Shuts down Windows. Windows displays a message when you can safely turn off the computer. Don't turn off the computer until you see this message. Computers with advanced power management shut off automatically.
  • Restart Shuts down Windows, and then reloads it (useful if your computer starts acting funny).

If programs are running, Windows closes them before shutting down, switching to standby, or restarting. If a program has unsaved files open, the program should ask you whether you want to save your work before the program exits.

Continue reading...

Monday, November 23, 2009

Security-relevant Standards Organizations

Organization Description

ABA


The American Bankers Association develops computer standards for financial and banking areas. The ABA is the Secretariat for X9, ANSI's Accredited Standards Committee for Financial Services. Standards developed by this committee focus on encryption and message authentication for financial institutions. The ABA also develops standards for personal identification numbers (PINs) and key management.

ANSI


The American National Standards Institute is the officially designated national standards organization in the United States and is the formal U.S. representative to ISO. ANSI does not develop its own standards, but is the clearinghouse for U.S. and international standards-for example, ASCII code, languages (e.g., C and FORTRAN), and communications protocols. ANSI committee are working on such security concerns as encryption and message authentication.

CBEMA


The Computer and Business Equipment Manufacturers Association develops standards in a variety of areas, including languages, graphics, and database technologies, and submits these standards to ANSI for approval as ANSI standards. CBEMA is the Secretariat for X3, ANSI's Accredited Standards Committee for Information Processing.

CCITT


The Comité Consultatif Internationale Telegraphique et Telephonique (International Telegraph and Telephone Consultative Committee) was established under the United Nations. It is responsible for the X.25 (packet-switched networks) and X.400 (electronic mail) standards and for other international communications standards. CCITT works with ISO on international standards for security.

ECMA


The European Computer Manufacturers Association is an association of approximately 50 European computer manufacturers. Its security groups are involved in developing standards for security in such areas as distributed interactive processing, distributed office applications, and open systems.

EIA


The Electronic Industries Association is a trade organization that has developed standards such as the RS-232 standard for terminals and computer connections.

IEEE


The Institute of Electrical and Electronic Engineers is a professional organization that develops standards and submits them for ANSI approval.
The IEEE 1003.1 standard, announced in 1988, is the official POSIX (Portable Operating System Interface for Computer Environments) standard for application portability in open systems. Along with many other POSIX standards efforts, it was developed in cooperation with the ISO (described below). Although the POSIX interface standard (also known as POSIX-1) is based on the UNIX system model, POSIX specifies how an interface must perform, not how it is implemented, so UNIX need not be the base operating system. POSIX.1 evolved in 1981 from /usr/group, the forerunner of UniForum, the Association of UNIX System Users. The /usr/group standard was an early attempt to specify a standard for a portable mechanism.
The IEEE 1003.1 standard has also been published by NIST (described below) as FIPS PUB 151 and by ISO (also described below) as ISO/IEC 9945-1.

IEEE has a number of committees, some of them security-related. The IEEE 1003.6 Security Extensions Committee grew out of UniForum's Technical Committee's Security Subcommittee. This committee is dedicated to developing standards for making a POSIX-compliant system a trusted system. Security subgroups are at work on security issues such as discretionary access control, mandatory access control, privileges, and audit trails, and standards are expected within the next few years.

IFIP The International Federation of Information Processing is a multinational federation of professional and technical organizations involved with computer and information processing. It was originally established under the auspices of UNESCO. IFIP has a number of committees. The Technical Committee 11 (TC-11) on Security and Protection in Information Systems does extensive work in proliferating security information internationally and in developing standards.

ISO The International Standards Organization (Organisation Internationale de Normalisation) founded in 1946, is an international organization composed of a number of national standards organizations. ISO's Open Systems Interconnection (OSI) basic reference model is a standard conceptual model for discussing data communications. ISO and other organizations are working on extending the OSI model to define security-related architectural elements.
Several groups within ISO are developing standards using cryptography as a mechanism for network security. Such standards will provide for data confidentiality, data integrity, peer entity authentication, access control, key distribution, and digital signatures.

MAP/TOP


The Manufacturing Automation Protocol/Technical Office Protocol is a consortium of factory automation users. Sponsored by General Motors (MAP) and Boeing (TOP), MAP/TOP has worked on pieces of ISO standards.

NCSC


The National Computer Security Center publishes the Rainbow Series of computer security standards for trusted systems, chief among them the Orange Book.
The NCSC sponsors the Trusted UNIX Organization, which consists of a group of vendors, including AT&T, involved in developing trusted UNIX systems. Security standards developed by TRUSIX will be POSIX-compliant.

NIST


The National Institute of Standards and Technology (formerly the National Bureau of Standards) specifies standards for many government-related products and procedures.
FIPS PUBs (Federation of Information Processing Standards publications) are written by NIST's National Computer Systems Laboratory (NCSL). FIPS PUBs are required standards for the acquisition of equipment and the processing of information by government agencies and contractors.

GOSIP (the Government Open Systems Interconnect Profile program) is sponsored by NIST with participation by a number of other government agencies. GOSIP specifies a set of data communications protocols based on the OSI model. All government agencies that buy networks must now comply with the GOSIP/OSI standard. In 1988, Version 1 of the GOSIP standard for networks and services was published as FIPS PUB 146. The standard is being revised to address security concerns and other issues.
Continue reading...
Computer Security

With computer systems increasingly under attack, it's no wonder that people are starting to take computer security more seriously. But despite this increased interest, many computer users still don't really understand what computer security is-and why it should be important to them. The headlines about the Internet worm, KGB agents, and million-dollar funds transfer frauds tell only part of the story, and it's a part most of us can't identify with as a day-to-day concern.

Computer security protects your computer and everything associated with it-your building, your terminals and printers, your cabling, and your disks and tapes. Most importantly, computer security protects the information you've stored in your system. That's why computer security is often called information security.

There's a longstanding view of computer security that its purpose is to protect against one particular danger-outside intruders who break into systems to steal money or secrets, or simply to prove they can do it. And although such intruders do exist, they aren't the only, or even the primary, danger to computer systems. There are many more immediate dangers, ranging from sharing your password with a friend, to failing to back up a disk, to spilling a soda on a terminal keyboard. These dangers aren't as newsworthy as flamboyantly named viruses, but
they're more likely to cause you problems on a daily basis. The following sections define computer security and outline the wide range of dangers to computer systems
Continue reading...

Increase your RAM and so system speed

1). Start any application, say Word. Open some large documents.

2). Press CTRL+SHIFT+ESC to open Windows Task Manager and click Processes tab and sort the list in descending order on Mem Usage. You will notice that WINWORD.EXE will be somewhere at the top, using multiple MBs of memory.


3). Now go back to the Windows Task Manager and see where WINWORD.EXE is listed. Most probably you will not find it at the top. You will typically have to scroll to the bottom of the list to find Word. Now check out the amount of RAM it is using. Surprised? The memory utilization has reduced by a huge amount.

4). Minimize each application that you are currently not working on by clicking on the Minimize button & you can increase the amount of available RAM by a substantial margin. Depending upon the number and type of applications you use together, the difference can be as much as 50 percent of extra RAM.

In any multitasking system, minimizing an application means that it won't be utilized by the user right now. Therefore, the OS automatically makes the application use virtual memory & keeps bar.
Continue reading...

Friday, November 20, 2009

Change the windows default identity

In windows XP, you can change the windows default identity (Computer Manufacturer Logo and other information's) and share your own private identity there. First you right click on My Computer then click on Properties, here may be you will see computer manufacture logo or empty area. So add your own logo there to make your computer more private.

Follow the given steps to change the system default Properties identity:


First click on Start button and type notepad in Run option then press Enter.

Now type the following text in notepad.

[General]
Manufacturer="
www.ComputerFreeTips.com"
Model="
Computer Free Tips and Tricks!"
[Support Information]
Line1="We offer various help topics including A to Z Computer Free Tips and Help."
Line2="Visit daily for new tips
www.ComputerFreeTips.com"


There are some standard keywords, for example Manufacturer, Model, Line 1, Line 2; you can not change these keywords. Now save this notepad file in c:/windows/system32 folder with file name, OEMINFO.INI.


Now choose your favorite picture to set as logo, using any picture editor resize the picture size approx. 150X150 pixels then save it in c:/windows/system32 folder with file name OEMLOGO.BMP.

Now close the all files and restart your computer after any changes to go into effect. To verify these changes, right click on My Computer and open Properties


Under General tab, verify the system properties with new settings.


Continue reading...

How to log off, restart and shutdown, connected computer from one location?

Windows XP has a built-in feature (shutdown tools) that is used to shutdown any connected computers from any one computer. Using this feature, you can log off, restart and shutdown any computer in your network. This tip is very useful for you, if you are a Network Administrator at your company, because if you have experience to shutdown all connected computers daily in your local area network one by one, definitely that job is annoying responsibility for you.

Follow the given steps to configure shutdown tool on your computer:

To use this feature, you will need to be logged into your computer with administrative rights.

To perform this task, first make sure your both computers are directly connected or connected to network.

Click Start button then type shutdown -i in Run option then press Enter for next.

Continue reading...
 

Friends

Followers

Fave This

Computer Technology Tips and Tricks for Devlopment Copyright © 2009 Magazine 3 Column is Designed by kamrul