Sunday, December 6, 2009

Configure the Standard Buttons Toolbar

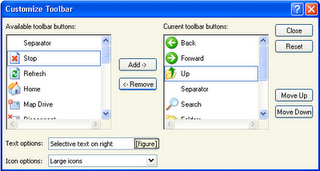
The six Standard Buttons are not the only ones you could have on your toolbar. In fact, you can choose from a total of 21 buttons, and you can display any collection of them in any order you want. This rearranging takes place in the Customize Toolbar dialog box, shown in Figure 1. To open this dialog box, select View | Toolbars | Customize, or right-click the toolbar itself and choose Customize from the shortcut menu.


Figure 1: Clicking Add puts a Stop button between Forward and Up.

The Customize Toolbar dialog box is well designed. The buttons you are currently displaying are listed in the Current Toolbar Buttons (right-hand) window, and the ones you are not displaying are in the Available Toolbar Buttons (left-hand) window. To add a button, select it in the left-hand window and click the Add button. To remove a button, select it in the right-hand window and click the Remove button.

You can change the order of the buttons you display as follows: select a button in the right-hand window, and then click the Move Up or Move Down buttons. The top-to-bottom order of the buttons in the Current Toolbar Buttons window is the left-to-right order of the buttons on the Standard Buttons toolbar. Group buttons together by inserting a separator. You can have as many separators on your toolbar as you like; the separator is the only item in the left-hand window that doesn't vanish when you move it to the right-hand window.

The amount of space the buttons take up on the toolbar is determined by the size of the button's icon and the text label. You can change either of these with the two drop-down lists at the bottom of the Customize Toolbar dialog box. The combination No Text Labels and Small Icons enables you to put a lot of small buttons on the toolbar, while Show Text Labels/Large Icons gives you a few big buttons.

Continue reading...

Changing the Behavior of Explorer Windows

The Explorer windows of Windows XP are descended from two parents: the folder windows of Windows 95 and the browser windows of Internet Explorer. The default settings of the Explorer windows borrow a little from each parent. If you don't like this compromise, you can change your settings from the Folder Options dialog box, shown in Figure k. To open this dialog box, choose Tools | Folder Options from the menu of Windows Explorer, or open the Control Panel and choose Folder Options from the Appearances and Themes category.

If, after experimenting with new settings, you decide the designers of Windows XP had it right after all, you can return to the Folder Options dialog box and click the Restore Defaults button.


Figure k: The General tab of the Folder Options dialog box, with the default settings.
Continue reading...

How to Help Displaying Screens

To see the Help And Support Center window (shown in Figure a), choose Start | Help And Support. The toolbar shows many of the same icons you see in any Explorer window, including Back, Forward, Home, Favorites, and History. You also see Index, Support, and Options commands. The Task pane (left side of the window) shows a list of topics from which to choose. The rest of the window displays the help information you request from the Task pane.


Figure a.: The Home page of the Help And Support Center

When the Help And Support Center window first appears, you see lists of help topics and tasks (click Home on the toolbar to return to it). Click a topic to see a detailed list of subtopics in the left pane. When you see a plus box to the left of a topic, click the plus box to see its subtopics. When you see a topic with a question-mark icon to its left, clicking the topic displays an explanation, and steps to follow, in the right pane. If a word or phrase becomes underlined when you move your mouse pointer over it, click it to see information about that topic.

If your computer is connected to the Internet, Windows automatically updates the home page of the Help And Support Center with news and updates, which appear in the lower-right corner of the window

Continue reading...

Thursday, December 3, 2009

How to Installing Programs Using the Add Or Remove Programs Window

Follow these steps to use the Add Or Remove Programs window to help you install a program:

  1. Choose Start | Control Panel. You see the Control Panel window.
  2. Click the Add Or Remove Programs category. Or, in Classic view of the Control Panel, run the Add Or Remove Programs program--if the icon is underlined, click it once; if not, double-click it. You can control whether you need to single-click or double-click icons to run programs.
  3. You see the Add Or Remove Programs window. This window has three buttons down the left side. Click the Add New Programs button so the window looks like Figure 1.


Figure 1: Add or Removes Programs window, when the Add New Programs button is selected.
  1. If you are installing a program from a floppy disk or CD-ROM, insert the disk or CD-ROM into its drive and click the CD Or Floppy button. If you are installing a program from a file on your hard disk or on a network drive, click the CD Or Floppy button anyway--you'll have a chance to tell it where to look for the program in a minute. Windows looks on any floppy disk or CD-ROM in your drives for an installation program (that is, a program named Setup.exe or Install.exe). If Windows finds an installation program, skip to step 7.
  2. If Windows doesn't find an installation program, you see the Run Installation Program dialog box, which asks for the full pathname of the installation program.
  3. Click the Browse button and specify the installation program you want to run in the Browse window. You can browse to any disk on your computer, or any disk accessible over your LAN, if you are connected to one. Click Open when you find the installation program.
  4. When the pathname of the installation program appears in the Run Installation Program box, click the Finish button. The installation program runs. Follow the instructions on the screen to install the program.

Once you install a program, the program name usually (but not always) appears in the list that the Add Or Remove Programs window displays when you click the Change Or Remove Programs button.

Continue reading...

Shutting Down and Restarting Windows

When you need to turn off the computer, you must shut down Windows first to allow Windows to close all its files and do other housekeeping tasks before terminating. To shut down Windows, choose Start | Turn Off Computer, click anywhere on the desktop and press ALT-F4, or press CTRL-ESC and choose Shut Down. You see the Turn Off Computer dialog box:


Your options are

  • Stand By Stores the programs and data that are currently open, and then shuts down Windows so you can turn the computer off. The next time you turn your computer on, you can pick up just where you left off.
  • Turn Off Shuts down Windows. Windows displays a message when you can safely turn off the computer. Don't turn off the computer until you see this message. Computers with advanced power management shut off automatically.
  • Restart Shuts down Windows, and then reloads it (useful if your computer starts acting funny).

If programs are running, Windows closes them before shutting down, switching to standby, or restarting. If a program has unsaved files open, the program should ask you whether you want to save your work before the program exits.

Continue reading...

Various Type of New Networking Features

Windows XP also adds many new network features especially designed to make corporate networking easier and more reliable, including
  • Networking has been integrated into the Task Manager to display real-time network usage and connection-speed information.
  • An enhanced Netdiag.exe command-line diagnostics tool is provided on the Windows XP CD-ROM.
  • An enhanced version of Network Driver Interface Specification (NDIS), version 5.1, with support for PnP and Power Event Notification, send cancellation, better statistics capability, and better performance.
  • A new version of the Windows Telephony API (TAPI), version 3.1, with support for H.323-compatible IP telephony and IP multicast A/V conferencing, recording of streaming A/V data for playback, USB phones, automatic discovery of telephony servers, and support for H.323 services such as call hold, call transfer, call diversion, call pack, and call pickup.
  • Support for newer network devices, including HomePNA phoneline networks, USB-connected network devices, software-based (also called controllerless or "Winmodem") modems, and infrared-enabled cell phones (as modems).
  • Support for Universal Plug and Play (UPnP) devices on a network, and use of UPnP to detect Internet Connection Sharing (ICS) hosts on a network.
  • Network bridgingOne computer can run two different types of networks (such as Fast Ethernet and IEEE 802.11b [Wi-Fi] wireless Ethernet) and act as a connection between them. You need a network card for each network type you're bridging.
  • Auto-configuration of IEEE 802.11b Wi-Fi networksWi-Fi (wireless Ethernet) networks are harder to configure than wired networks such as Fast Ethernet, because you must synchronize the card to the wireless access point that allows your PC to talk to others. Windows XP Professional detects the correct settings automatically.
  • Ability to store and recall settings of various wireless networks the user has connected to in the past for automatic configuration when the same network is encountered again. This feature simplifies moving between multiple wireless networks, such as home and office or different offices. Post SP2, the UI for wireless is more graphical and intuitive, and XP remembers which networks you have previously authorized an insecure connection for, and automatically connects when that network is available in the future. Available networks are arranged in order of signal strength, as show in Figure 1.1

Figure 1.1. Friendlier wireless networking interface reports available networks and remembers last session's settings.

[View full size image]


  • An enhanced Connection Manager with new management options, split tunneling (secure VPN and public Internet access at the same time), Favorites feature for storing connection settings for different locations (useful for business travelers), client-side logging for troubleshooting, and support for ICS.
  • The enhanced Network Troubleshooter feature, available from the left-hand menu of the Network Connections menu, provides one-stop access to network-related tools in the Help and Support center. You can start Ping and Net View commands to diagnose and check Internet and LAN connections, as well as run troubleshooters for Internet Connection Sharing, Modems, and other home and corporate network configurations. A new Network Diagnostics tool scans the network and tests your network card. As shown in Figure 1.2 at the end of the testing process, it displays the results of its tests for Internet service settings, computer information, and network adapters (including modems).

Figure 1.2 The Network Diagnostics tool displays the configuration of both hardware and software components on your network.

[View full size image]


  • Support for encrypted folders with multiple users.
  • Remote desktop support via Remote Desktop Protocol (RDP), enabling users to access their computers remotely from anywhere with network access, including other offices, at home, or airport kiosks.
  • Improved Group Policy feature with hundreds of new policies provided, making it easier to choose a predefined policy instead of needing to modify one.
  • Remote Assistance to allow network or Internet-based help desk personnel to view a user's display and provide training or technical assistance. This feature can be centrally enabled or disabled as desired.
Continue reading...

Difference Between Windows XP Versus Linux

Trying to compare Windows XP versus Linux is difficult for several reasons, including
• Windows XP requires a relatively recent computer with at least 128MB of RAM to function, while Linux can run successfully on even 486-based systems long obsolete for use with Windows
• Windows XP is available in just two versions (Home Edition and Professional), while Linux is available in numerous distributions
• Windows XP is primarily a GUI-based operating system, while Linux is primarily command-line driven (although KDE and Gnome, the two most common GUIs, are increasingly popular)
Although Linux has made great strides in so-called "back end" uses such as Web servers, network servers, and embedded devices, Windows XP is a better choice for desktops for several reasons, including
• Journaling file system for higher reliability and crash recovery.
• Compatibility testing and guarantees for operating system and applications.
• Wide availability of commercial applications at retail and online stores.
• Clustering and base-load balancing.
• Long-term roadmap of operating system deployment plans.
• Larger hard disks and maximum file sizes. Linux's maximum file size is 2 Gigabytes; Windows XP's limit is 18.4 quintillion bytes (Petabytes).
• "Synchronous I/O," which allows smoother running in Windows XP when multiple threads are being processed and waiting for input or output. It improves SMP scalability as well.
• Consistent GUI across all toolsLinux has no single standard GUI at present.
• A single version which can be installed for most major languages and countries.
• Dedicated support network, with close to one-half million Microsoft-certified trained professionals and engineers.
We believe that the entire Linux/Windows controversy comes down to this: Microsoft offers lots and lots of powerful stuff (which you can use to build very sophisticated software) from the C++ compiler, to the component-nature of Excel and other apps, to the ASP scripting language, COM, and so on. These tools let you leverage everything Microsoft offers to make very powerful applications. As people used to say in the '60s and '70s, nobody ever lost his job buying IBM. Now it's safe to say nobody ever lost his job buying Microsoft. True, you're locked into Windows because the stuff you build on Windows systems can't be ported to UNIX variants, but that's the price you pay for the tools, the user base, and the support and training. Although increasing support options are available for Linux (see www.linuxcare.com), enterprise-level support for Linux is still not as widespread as for Windows.
Continue reading...
 

Friends

Followers

Fave This

Computer Technology Tips and Tricks for Devlopment Copyright © 2009 Magazine 3 Column is Designed by kamrul